Tuesday, November 14, 2017

Lily and Foxy

This is the first piece that I created based on actual "models". Meet my dog Foxy (RIP 10/2002-11/8/2017) and her bestie, Lily (5 year-old boxer-pit mix). They are located out front of Camas' Naturally Healthy Pets and People. There is a metal box that supports them, which will eventually be home to  a plant. 
Technique: I used a plasma cutter on metal that already had a nice rust patina. I added some brown stain around the edges, but hope that it will create a darker hue to the rust finish over time. 


Monday, August 8, 2016

Neighborhood surprise


I went for a run last week in my neighborhood, and was pleasantly surprised to find a bottle tree that I had donated to the school auction, adorning a front yard.  It was one of the first series of trees that I designed back in 2010. It looks like it's owners have taken good care of it. If you would like to drive by yourself, search for it next to Lincoln Elementary School. 

Wednesday, June 8, 2016

Stands for hanging baskets

I built two plant stands (10 feet high) with brackets for hanging planters, which were installed in downtown Camas on NE 5th Avenue. This was a fun project as I was asked to build on a very tight budget, but left to design it however I desired. 

I ordered only a few cast pieces, used square steel stock, and other surplus materials that I had on hand. I built the bases out of 6" square steel tube that I had left over from another project and added a moulded base cover to the top. If I had to buy the 6" square tube, it would have been a few hundred dollars over their budget. The powder-coating was donated to the project, which is an added bonus to the downtown.

Happy welding to all of you out there.  Send me some comments and photos of your own! 

Sunday, July 19, 2015

Bottle Tree!


This past week, I completed another bottle tree for some friends in Battleground, WA. It was so much fun! I have been busy building all kinds of other things lately, that I almost forgot how much I love creating these trees.  


Sunday, April 26, 2015

Button quail need a bigger home

Cage Construction Part 1

Last week, two button quail were given to my son for his birthday.  For some reason, he really wanted these birds, and his aunt thought it was a good idea to give them to him.  Side note: I didn't know anything about taking care of these birds, and we all know that I will end up caring for these instead of my son.  

The cage that they arrived in was fine while they were a few weeks old, but its a cage for hamsters.  They spend most of their time squeaking and running around like crazy things in their cage. Now that they are older, when they are out of their cage they fly around.  I think that they should be able to fly a bit in their cage too, although I read somewhere that button quail don't fly and don't perch.  Since my quail do both, I am building a bigger cage so they can continue to be unique to their breed. 

I have some stainless steel bar remaining from my high top counter project, and would like this cage to look decent if it will be in my living room for a few years. I looked around my yard for anything else interesting to add to the design, and found a window, and a cement mixing tub.  The initial plan was to use the tub for the base of the cage, and allow it to be removed easily for cleaning.  The window will be the top to allow light, and for people to see the birds from above.  This is how far I got today. I welded the stainless steel frame together, quickly polished the material with 60 grit, removed the hardware from the window, and scrubbed it clean (btw: it was still dirty in this photo). 

If you can envision it, the next part of this design is to add the wire mesh from the bottom of the window to the outside edges of the tub, a small door (6" square), and paint the window frame.  The window will be hinged to the stainless steel frame in order to attach the mesh to the frame and to make it easy to add large items to the enclosure than through a small door. Stay tuned.


Saturday, April 11, 2015

The rain chain was well received at the auction.  That is a relief!  My dad donated an armadillo that was built by a former employee.   I found out at the MS Olympia Walk that the armadillo was hugely popular.  There was a bidding war over it.  Jenn asked if I could make about five more to give to the friends that didn't win the item at the auction.  I can recreate the item with a bit of work.  It kind of cracks me up that such a small item was such a huge hit.  I have said this before...who the heck can anticipate what people are going to want to buy?  I have signed on to making five or six duplicates for her friends.  How funny is that?

Sunday, March 22, 2015

Stainless steel project for charity

  
Yep, its me.  I am spending my time this weekend working on a project for my cousin, Jen.  Her fundraiser auction for the Olympia M.S. Walk is next weekend.  I don't tend to raise a lot of money at these events with my metal art.  For example, for three years in a row, I donated a bottle tree to the school auction.  The top year, it earned $80. The market for these trees is between $100-300.  I sold a bottle tree for $250 after hosting a booth at an art festival.  

With that said, I try not to take the low bid price personally. It could be the art or just that the crowd is not really into art, as they are more interested in getting a good deal on car washes or window cleaning.  I took a poll of my friends and asked what I should create out of metal, and what is a popular item right now.  The winning idea was a rain chain.  I have never made one before, but the concept seems simple.  Replace the gutter downspout with a chain and make it look interesting as the water pours down it.  I decided to use stainless steel so that it wont rust, and I have a lot of the material on hand.  The material was given to me by the Pomegranate Center when they were cleaning out their garage, so some of the pieces have an interesting shape.  I chose one that looks like a vine. I will be cutting it more to resemble leaves.  I found blue glass globes from a light fixture at the Rebuilding Center for about $3 each.  They didn't have any chain there that I could re-purpose, so the chain is new from Lowes.  

The final design turned out pretty well, albeit, photographing stainless steel in my garage is not really easy.  It stands five feet with another eight feet of chain.  Spread the word, email me your bid if you are interested.  It is for a great cause!  


Saturday, November 15, 2014

Planning a kitchen high top counter

March 2015: The evolution of this kitchen remodel is slow, but has been worth all of the work.  I started this project two years ago.  If you can imagine, there was a defunct fireplace in that corner and I looked at every day for eight years before I decided to get rid of it.  Last week, I passed the final inspection for building permits.  I still haven't built the high counter, as I am still contemplating the design.

November 2014: It's a bright autumn morning and I am looking forward to a full weekend of building.  My first task is to finish trimming a set of windows in my kitchen, in order to prepare that wall for a high top counter.  I will design the support system from stainless steel to match the 1920's chrome look in the kitchen.  I can hardly wait to get to the creative part of this project!  If anyone has any photos of stainless steel bar legs/posts or whatnot, I would appreciate some collaborative ideas.  

Enjoy your weekend everyone, wherever you are.
-Sarah


This is where I started..


Status: April 2015

The high top counter is finished! The legs are a combination of 1" x 1/8" stainless steel bars.  The bases are composed of 1/2" thick stainless steel brackets, which were scrapped from a glass-steel railing. And the top is a butcher block counter from IKEA. 
I have a bit of a confession this project. I found that no matter how well clamped down the parts were, the heat from the welds caused havoc in my attempts to level the base feet.  Those that are more patient than I, might have fussed with them until they were perfectly flat.  Since I am not patient, nor a perfectionist, I cheated with a few felt pads to achieve levelness. If any one has a tip other than felt, send me a note. All in all, I think that it looks pretty good, and will serve the purpose that it was intended---as soon as I get a few bar stools.


Tuesday, October 21, 2014

Pomegranates

Maybe, I spend too much time volunteering for the non-profit, Pomegranate Center since the first thing I design out of metal in months is a Pomegranate!  I had fun with the plasma cutter. I experimented with two techniques for cutting out those shapes.  The smaller of the two was all freehand.  The large one, I used a guide that attaches to the plasma torch end, and uses a magnet (or suction cups) to adhere to the material as you draw a circle while cutting.  I liked the accuracy using the guide, over free hand.  Any thoughts from my readers as to which one looks more attractive?  I painted the outlines of the image, and delivered them to their staff this weekend.  The pomegranate will be mounted on their gazebo roof.


Garage clean up

You guessed it, I was waylaid by other home renovation projects and that is why my blog has been so silent. Although it felt satisfying to check off other projects on my list, I have been itching to return to metal work. With that said, I wanted to share with you a few photos of what happened to my garage while I was busy with those other projects.  It was crammed full of lumber, tools everywhere, and piles of scrap metal that my friends at the Pomegranate Center gave me a month ago.  No time to sort, so it was all dumped in a pile.  I spent two days cleaning, then rewarded my hard work by playing with the plasma cutter.  I will share that project in the next series of posts, but first, here are my "before" and "after" cleaning snapshots.  
BEFORE

AFTER

Wednesday, June 25, 2014

Debrief from Prescott


I had a surprisingly good time, volunteering to build a community park last weekend.  All I knew before I left for this trip was that a community wanted to transform a small burned out lot into a gathering place. The design would include reclaimed materials from nearby farms. What follows is a summary of the project.

Day One
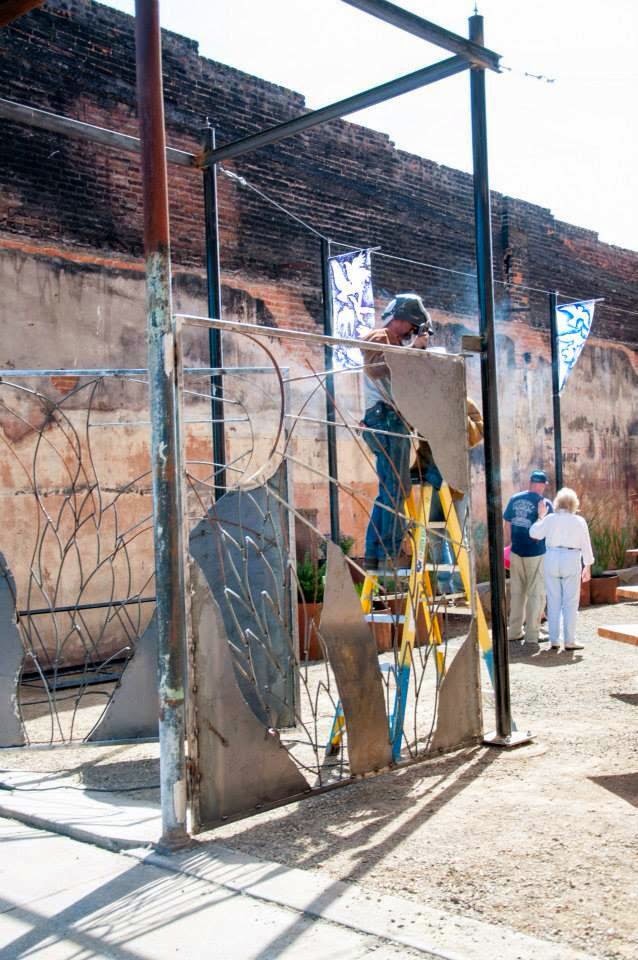
in Prescott, Washington, I was shown a pile of steel materials, which consisted of rebar, railroad ties, and remnant sheet metal.  Then I was asked to make it into two gates that would be 8' x 8', in a design that the community sketched (not to scale).  Also, I was asked if I could finish it in three days.  My daughter and I were the only volunteers with metalworking experience as far as I knew.  


After I recovered from a moment of what felt like, panic, I began an inventory and planned out how to move forward.  We taught a few volunteers how to operate the abrasive saw and set them to work on cutting all the rebar.  It was a bit of a challenge working on the floor of this shop, even though it was perfectly level.  The owner of the shop generously loaned the space, the tools, and miscellaneous materials for this project. 

The framework was completed by the end of the day and a pile of materials were ready for Day Two. We needed to modify the design of the gates slightly in order to brace them structurally.  At this point, we had not come up with any solutions that would not completely alter the original design.

Day Two in Prescott, we had a few more volunteers that were new to the machinery, but enthusiastic to learn.  Whitney was in charge of laying out all of the rebar into the wheat design, and teaching them how to use a grinder.  I continued to weld, plasma cut the sheet metal, and lead this portion of the project. Whitney and I proposed a moon and sun design at the top of the gates to add structure, which was approved by the group.  By the end of the day the two gates were tack welded and the new structural parts were in place.

Day Three in Prescott, we spent the morning welding up the gates, grinding the sharp edges, and adding bracing where needed. By the afternoon the gates were moved to the site and the difficult task of installing them to the existing beams began.  
Thankfully, another welder from the community with plenty of experience stepped in to help.  Together, the gates were mounted after about three hours!  From the happy comments from the citizens, they must have turned out as they hoped.


Monday, June 9, 2014

In a few weeks I will be driving four hours to the small town of Prescott  to help them build a new community gathering place.  They needed welders, so I volunteered.  I have been following the work of the Pomegranate Center for years and all of their projects look amazing.  They build everything in a weekend.  I feel a bit like I volunteered for one of those reality shows that throw a bunch of things at you, then see how fast you can put something wonderful together. We'll see if I am even close to the mark on how the weekend will evolve. I promise to post updates.   
Check out the project at: http://pomegranatecenter.org/walla-wallaprescott-community-build/#more-2190

Monday, May 26, 2014

Let me know if you have a small welding project in mind...

It is Memorial Day and as a Veteran of the US Army, it is a day to be thankful that I made it home from war, and grateful to those that were brave enough to give their lives so that I could make it home.  

I am also beginning anew with this welding blog.  I hope that what I have been enjoying as a hobby, can translate into a type of currency. I want to weld for trade.  Up until today, my handiwork has been by word of mouth.   

Thank you for showing your interest.  Please contact me with questions or ideas for trade!